Tips for Makers: Taming Metal Part 2, “Treat and Heat”

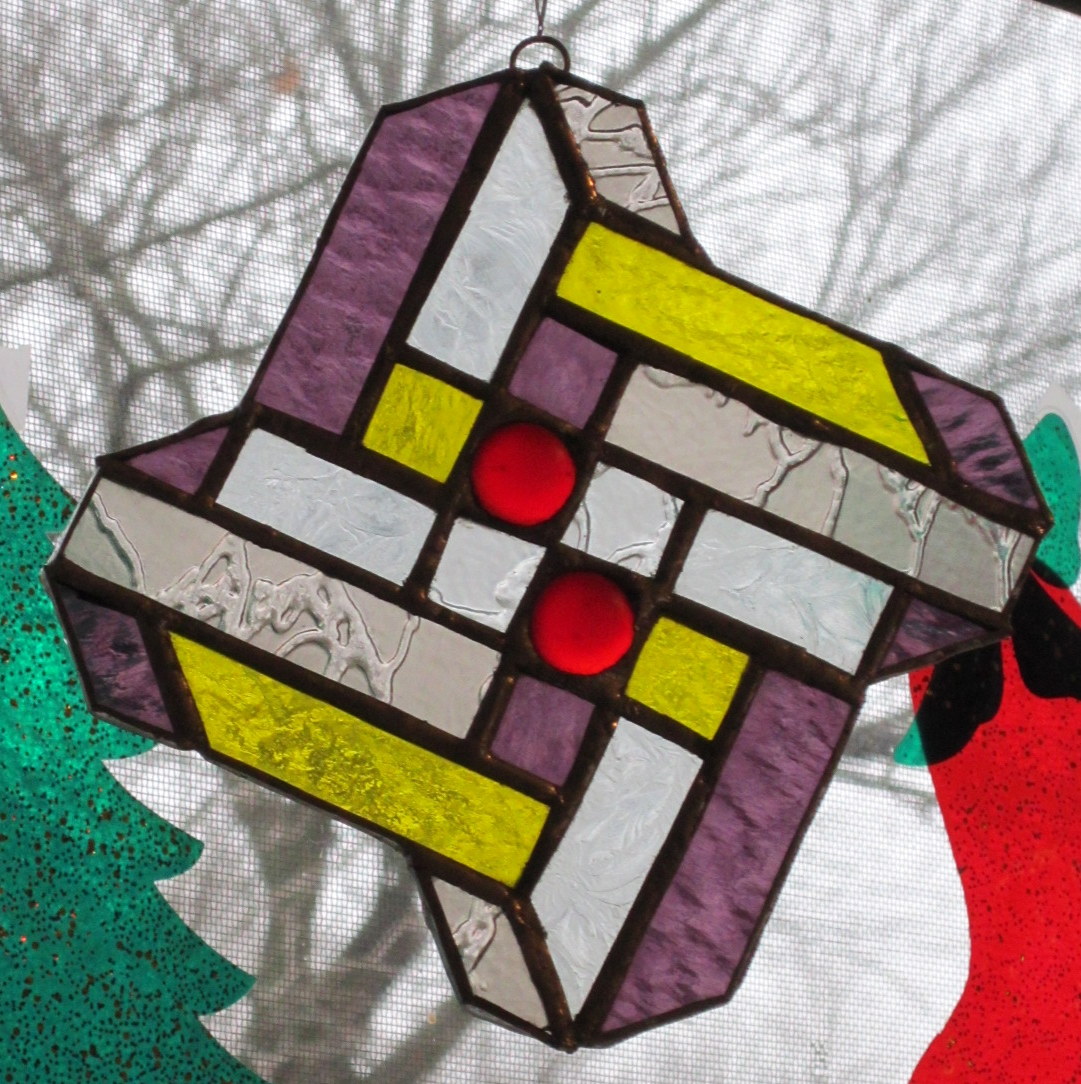
My favorite of the sun-catchers that I have made
Last time I covered some of the kinder, gentler ways to work with metal. In this post, I want to tell you about soldering. This is the metallurgical technique with which I have the most personal experience. I have used it to create silver jewelry and to attach transistors to electrical components like circuit boards, as well as making stained glass sun-catchers and sculptures.
Soldering
- Solder, a metal alloy used to join other metals together, comes in different varieties that have different melting temperatures, and your solder must always have a melting temperature lower than that of what you are joining.
- There is soft solder (melting between 190 to 840 °F) and hard solder (840 °F and above), which is sometimes called ‘silver solder‘. When working with high-temperature solder it is often referred to as ‘brazing.’ When a joint is particularly delicate (ie, joining two very small things or a small thing to a large thing) or the finished item is going to see a lot of wear and tear, it is better to use a harder solder and more acidic flux.
- In some cases, once your solder hardens it may actually be stronger than the materials you are joining. (This is also true of wood glue, by the way. It is usually easier to break the wood that you join than the place where it is joined.)
- Solder is often in the form of wire on a spool that is unwound and cut to the size needed for a particular joint. I have also used soldering solutions where tiny bits of solder are suspending in a liquid (see ‘flux’ below).
- There are two different kinds of tools you can use to melt your solder. A soldering iron is more or less shaped like a fat pen and is held as if you are writing. Be careful with this kind because once gets hot it stays hot as long as it is on. A soldering gun is shaped like a pistol and has a trigger that the artist presses to heat the tip each time. In both of these cases, the tip of the tool comes in direct contact with the solder and melts it so it can flow into the crack between whatever is being joined. When I making circuit boards, I used a hot air soldering iron that was held like a soldering iron but it had an open tip where air was heated and forced through, so the tip never came in contact with the solder itself. This was used with a very low temperature tin solder that has a high rate of conductivity which made it is ideal for electronics. Some hard solders may require a torch instead of an iron or gun.
- Before you can solder, you have to treat the joint with flux. This is a slightly acidic solution that takes away residue left from handling with bare hands, and it facilitates the solder’s flow into the joint. It is only mildly acidic, but if it gets into your eyes it can cause discomfort (trust me, I know from firsthand experience.)
- Safety: It is a good idea to wear gloves when soldering, especially if you are using a soldering iron which stays hot between joints. Stained glass soldering works at a low enough temperature that I have never gotten a blister from contact with the iron, but I have gotten sore, red fingers that last for a couple days. Keep in mind that the longer you have to apply the heat to the solder, the more the surrounding metal will also heat, so you can get burned if you are holding the materials you are joining with bare hands. Also, when flux heats it can sometimes spit like bacon grease in a frying pan, so if you may also want to wear goggles to keep the hot liquid from getting into your eyes.
Tips for Makers: Taming Metal Part 1, “Glues and Screws”
Friends, makers, cosplayers, lend me your ears! (Or eyes as the case would be) I attended several different sessions during my awesome convention experience in Lincoln, including three that were all about making the cool props, costumes, widgets and gadgets that can add that extra zing to your Steampunkery. This is the first installment of a multi-part tipfest for those of you who like to get your hands dirty just in time for Halloween.
I have taken many art classes in my time, and I was a fine arts major in college before I injured my drawing hand too badly to continue. I still minored in Art History though, and to qualify I took one of my favorite classes of all time, Intro to Sculpture. We worked with a variety of materials over the summer, but my absolute favorite was metal. I love it for two reasons: under the right conditions it is totally malleable, and when you are done it is incredibly strong. And shiny of course, let’s not forget shiny 🙂
 At Weekend at the Asylum there was a session called “Taming Metal” that was run by a panel consisting of “Herr Doktor“, Trevor Frank and “Dr Quack.” They started with the easiest way to join two metal pieces together and moved to the more involved techniques as the session went on, and they also touched on some important tools and safety tips, and etching advice. The following bullets are based on my notes that I took during the session.
- Metal can be joined in many ways ranging from “glues and screws” to welding. The stronger the joint you are looking for, the more sophisticated the equipment and the more safety precautions you need to take. There are serious safety concerns when working with torches, both for burns to your skin and to your retina which can result in temporary blindness and serious long-term effects on vision, so NEVER cut corners when it comes to safety. “Metal doesn’t care how old you are, or how experienced you are.”
-

Epoxy often looks like two syringes that are connected.
But let’s start with the easier stuff. Epoxy is more effective than other types of glue for adhering metal to other metal, or metal to other materials. And what is epoxy, you ask? It is usually a combination of two resins that are only mixed at the time you are using them and any extra must be disguarded, unlike glue that can sit on your shelf forever and more or less stays the same (though of course, glues to dry out over time).

- Any time you are going to use an adhesive rather an a screw, solder or welded connection make sure that you rough up your surface. The little scratches left behind by sand paper or steel wool will give your glue more to grip and create a better seal. And to give your glue its best shot, try to find a way to clamp or weigh down the connection point for at least a day or two while the adhesive sets. To preserve the look and texture of the metal while clamping, it is a good idea to put a cloth between your material and the shoes (or holdy-onny part of your clamp) or use a clamp with rubber covering the shoes.
-

A few shapes that nuts can take.
Nuts and bolts are a great way to hold metal together, but you will probably need to drill holes before you start. Dremels and other small, handheld drills can get through most thing sheets of metal, but watch out for shavings that can be sharp. But, it can be hard to find nuts and bolts that are the right color or type of metal (most are shiny, stainless steel like those at the right) to go with steampunk designs, so you may want to pre-rough them up if you are planning to add paint or use rivets instead.

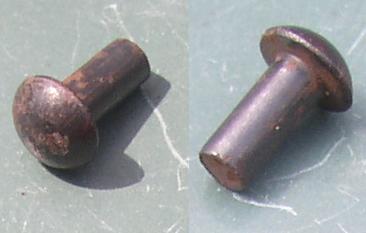
- Rivets are cool and very steampunk. Unlike screws and nuts n bolts, rivets are more or less meant to be permanent fasteners. The look a bit like a screw, but the shaft is smooth. The shaft is put through a pre-drilled (or pre-existing) hole and the tail end get smooshed to create a little barbell that holds your materials in place. If you like the look of rivets but don’t want to take the time or find the right tools for the job, I will give you some advice about how to fake rivets for cheap in my “Creating with Quicksilver” post next week.

Check out Part 2: “Treat and Heat”
10 Months of Blogging and Powers of 10(ish)
I will get back to Steam Tour stuff in my next entry, but I hit a milestone yesterday (200 posts!) and I thought I’d take a moment to share some info with the blogosphere.
If you are a blogger then you probably spend at least some of your time worrying about your stats and traffic. It’s natural, you put a lot of energy into your posts and you want to know who is reading them, and how it compares to other blogs. But, there aren’t a lot of real concrete facts out there to look at and compare to your own progress. So in the spirit of sharing and adding to the data out in the ether for other bloggers to use, here are some stats from ForWhomTheGearTurns.com.
What I have found so far is that there is something of a pattern starting to emerge, that loosely follows a series of powers of 10.
There have been 19,000+ hits on my blog, so let’s round it to 20,000 views for the sake of the math. This happened over the last 10 months or so, which averages to 2000 views per month. Of course, when I first started this was much lower, and August was my best month ever at around 3000.
There have been about 2400 shares, which we’ll round down to 2000 shares. This converts to around 10% of views turning into shares on Pinterest, Facebook, Tumblr, StumbleUpon, Twitter, and Reddit (in that order).
I have gained about 190 WordPress followers, which we can round up to 200 followers, again for the math. So for every 100 views I have gained approximately 1 Wordpress follower. This also averages out to about 20 per month. I have followers on Facebook and Twitter as well, but WP followers seem to be the most consistent indicator.
And because I also just published my 200th post that comes out to about 1 WP follower per post.
Do you have stats to share? I’d love to compare notes!


")


